
Five Things I Learned about Sequence Design with Kris Boulton
Possibly my most niche and geeky conversation yet... and that is saying something.

This interview was not supposed to happen.
I was booked to talk to Manu Kapur about productive struggle, but Manu did not show up (perhaps Manu was trying to give me a concrete experience of productive struggle by forcing me to think on my feet and find a guest at the last minute). So, I messaged Kris Boulton and asked if he fancied stepping in. He did, and within about three minutes, he had invented a format for us.
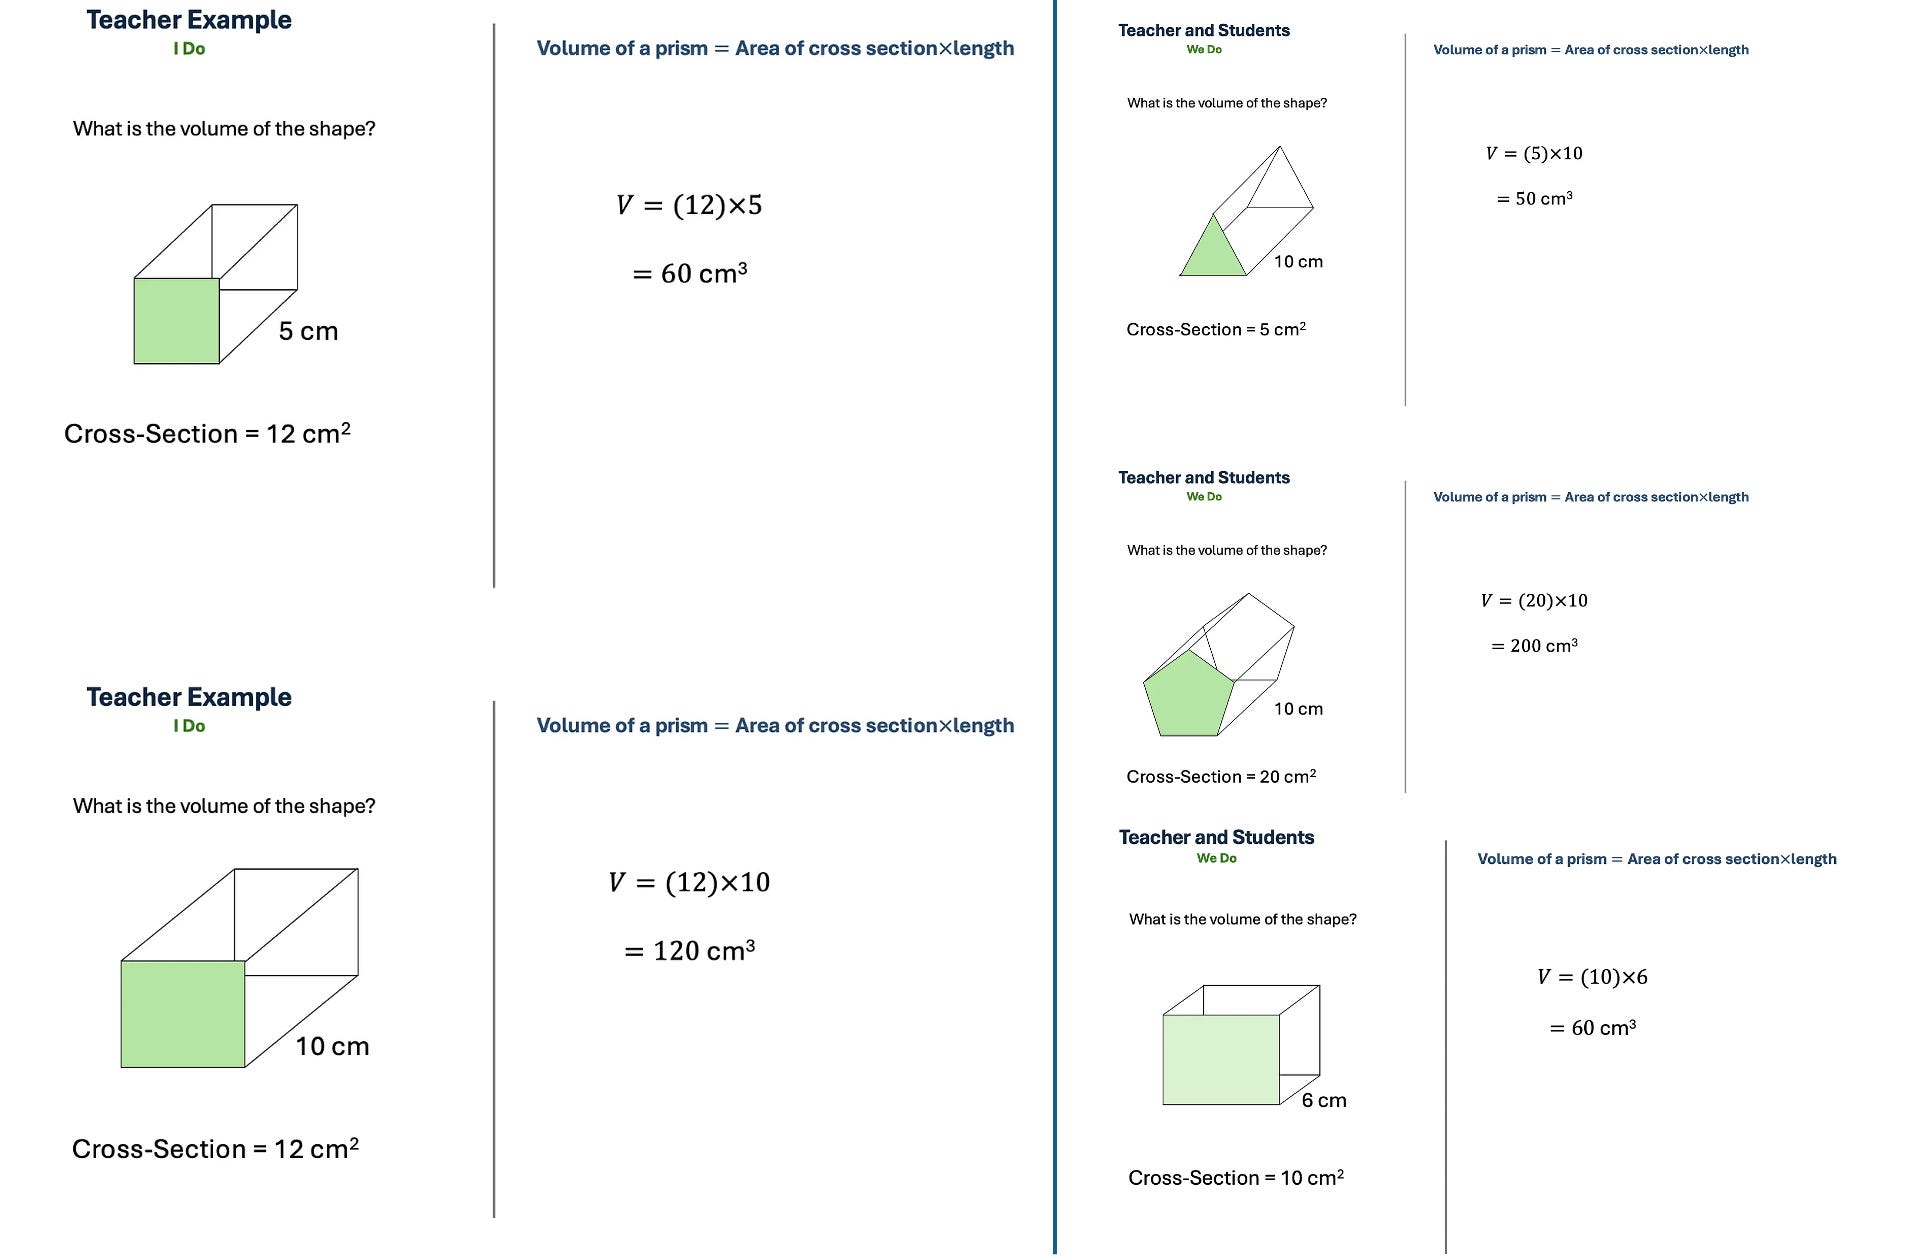
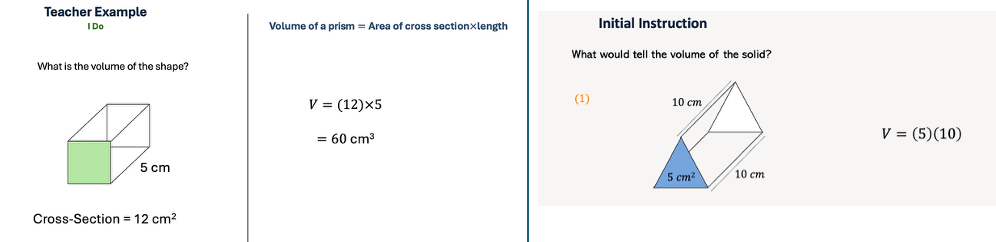
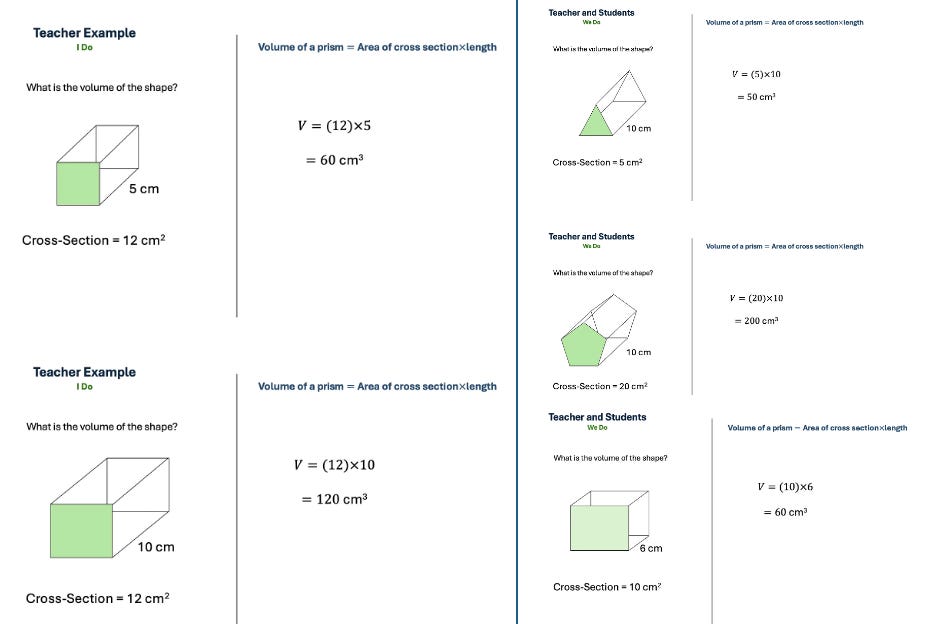
Kris runs Unstoppable Learning, where he works with schools and teachers to improve the quality of their instruction, particularly in how to sequence the examples they use to teach a concept. He had been sent a teaching and testing sequence on the volume of a prism, built by an early-career teacher he is working with. Here it is:
Take a few moments to look at it.
What do you like?
What would you change?
I think this sequence is good. The variation is controlled, with only one feature changing at a time. The teacher has generalised from the start, using “area times length” rather than a cuboid-only formula. Two teacher examples, then straight over to the students. I would have been delighted to produce that ten years into my career, and it was made by someone in their first couple of years.
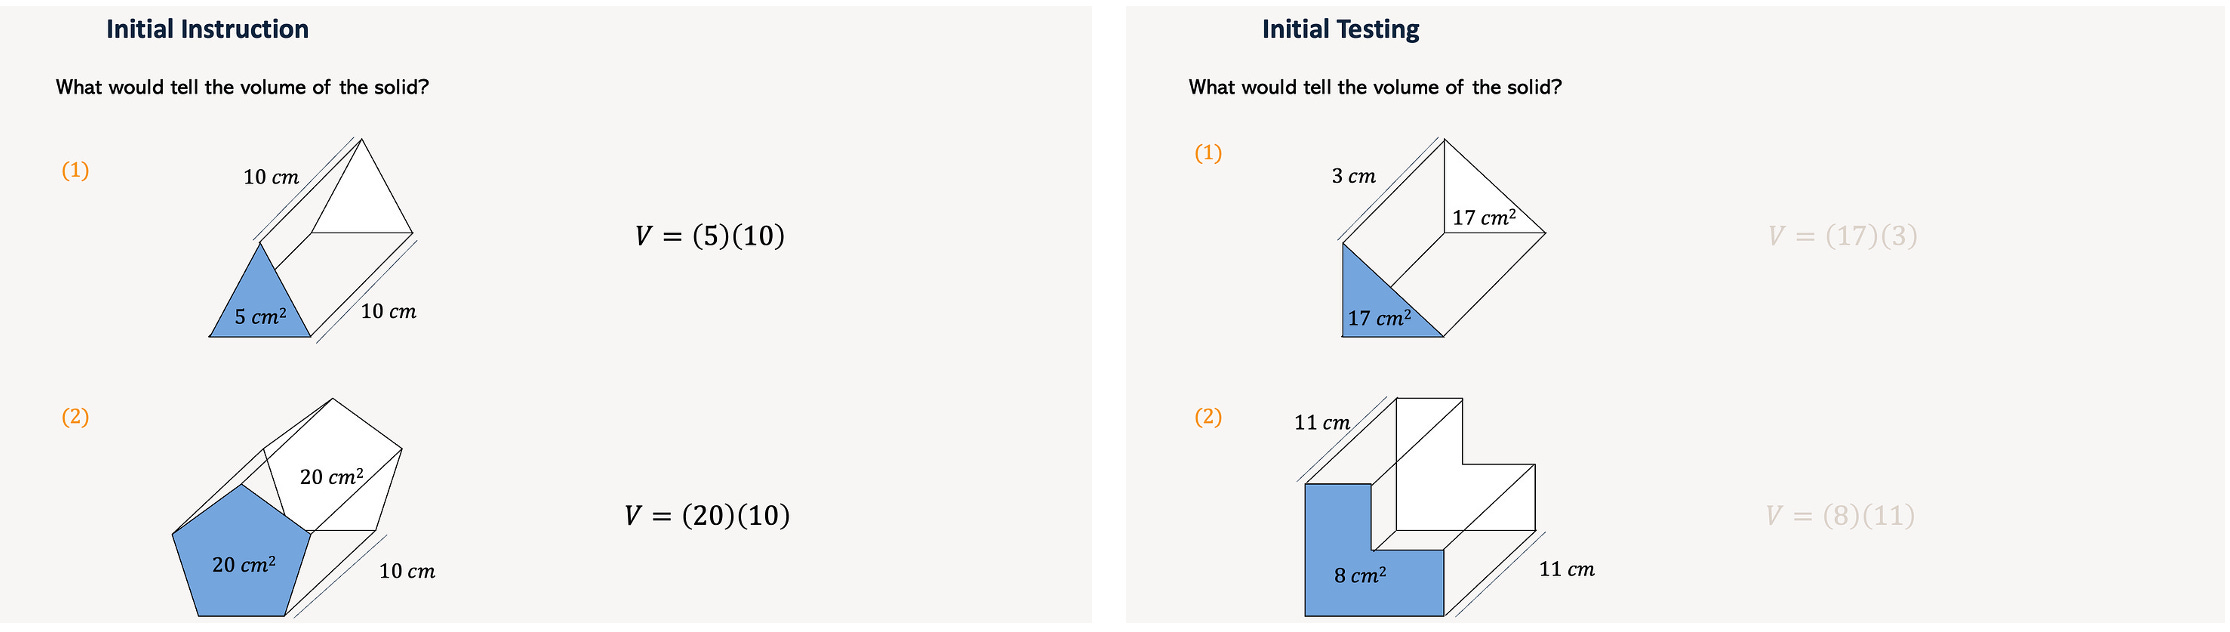
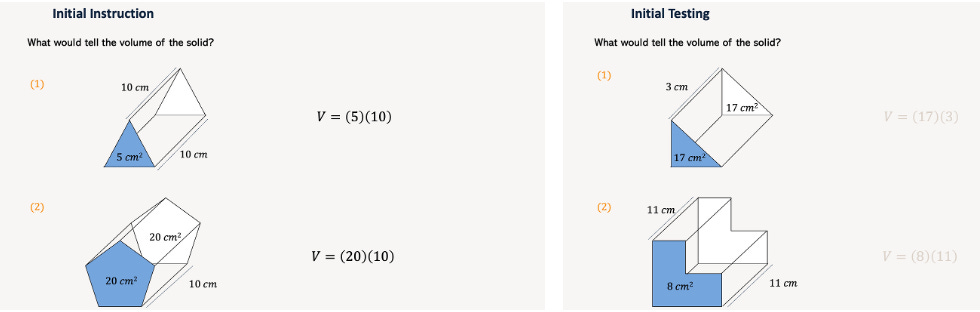
Then Kris rebuilt it:
Again, before we get into the nuts and bolts, two further questions:
What differences can you see?
Why do you think Kris made these changes?
In our conversation, I focused on the five differences I think travel furthest - the ones you could apply to almost any sequence you plan, whatever the topic - and quizzed Kris all about them.
Enjoy!
1. Start with the general case, not the cuboid
In virtually every single resource on the volume of a prism, the first prism chosen is the cuboid:
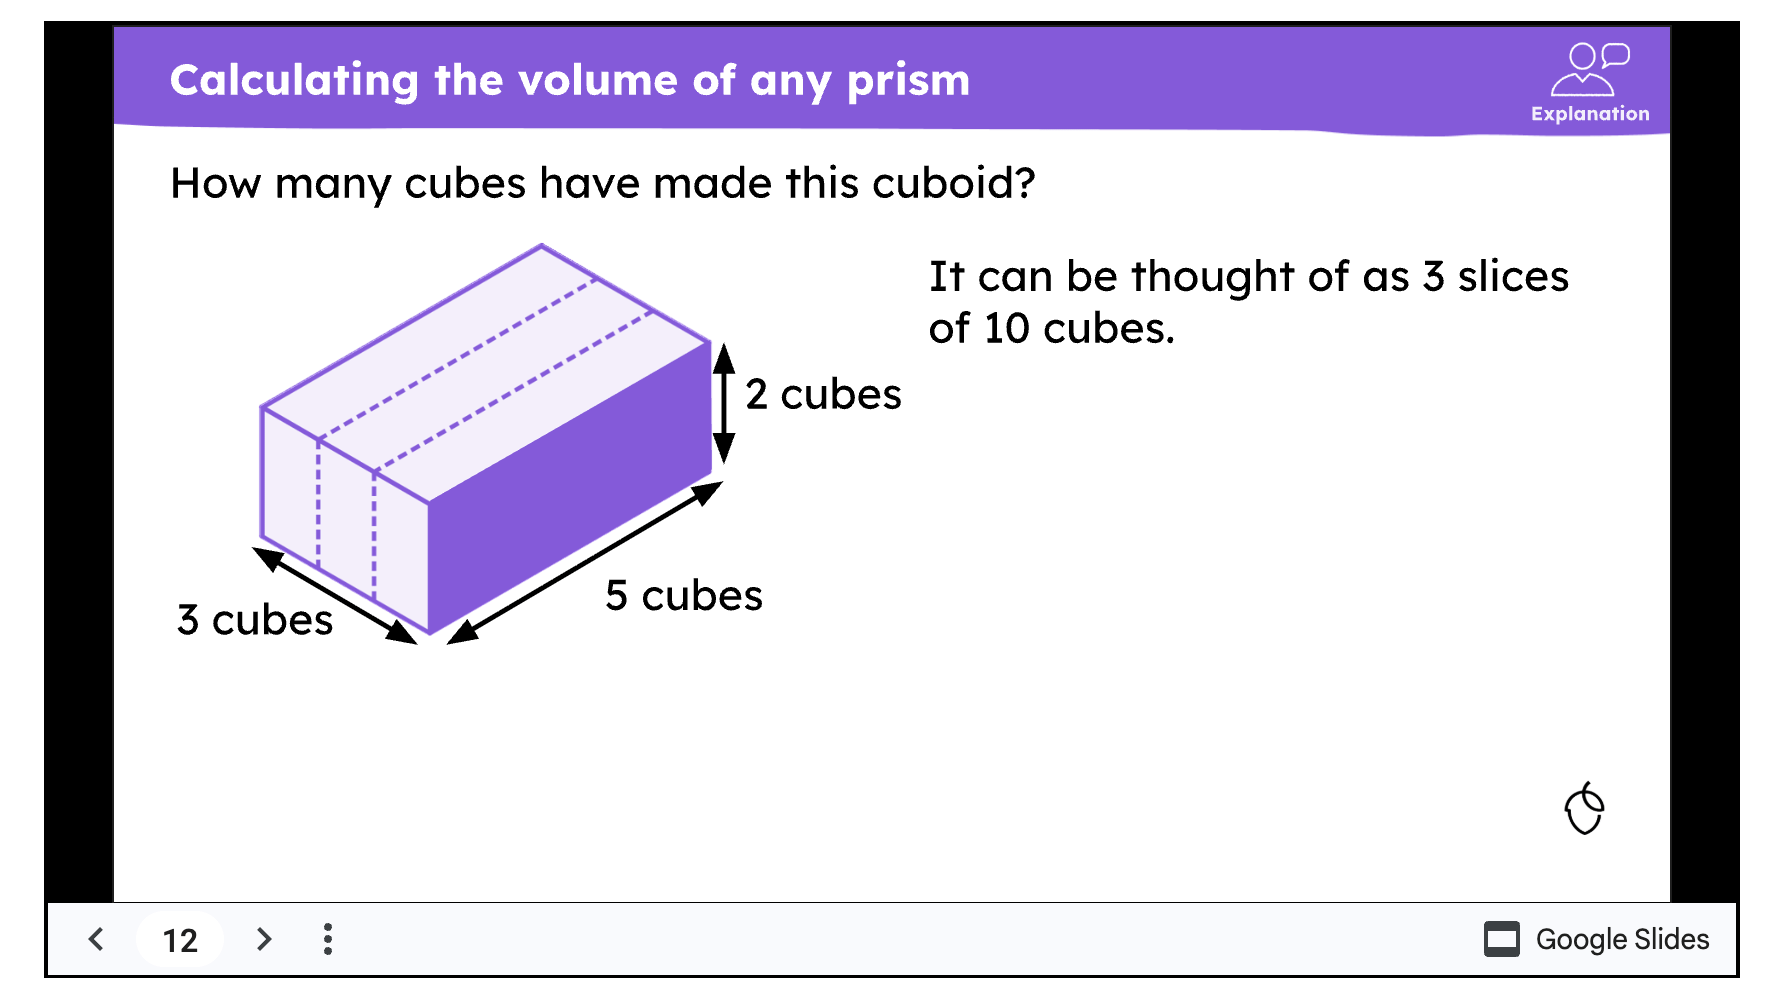
This makes perfect sense as the cuboid is the simplest prism, so a natural starting point.
The trouble is that a cuboid is the one prism where the rule behaves oddly.
In a cuboid, every face is a rectangle. So it is not obvious which face is “the cross-section”. In fact, you can find its volume in three different ways, by selecting any of the three faces and multiplying by the length perpendicular to it. Every other prism has one face that visibly stands out as different from the rest. In a triangular prism, the triangle is the only non-rectangular face, so the question “which area do I use?” answers itself straight from the diagram.
That is why Kris starts with a triangular prism, and saves the cuboid until the very end.
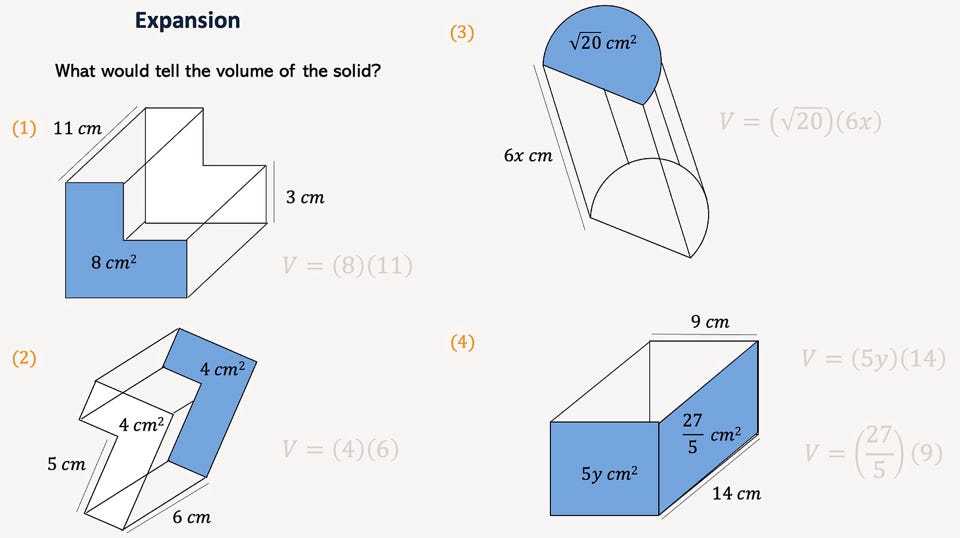
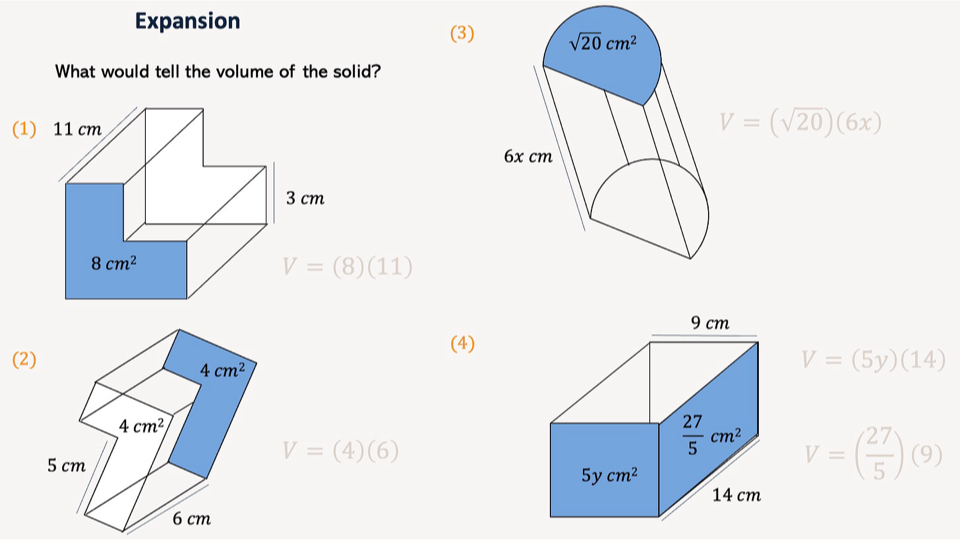
And when the cuboid finally arrives, right at the end of his expansion sequence, it is not just another example. He shades two faces and gives two perpendicular lengths, so there are two valid expressions for the volume. At this point, students are in a much better place to appreciate just why the cuboid is a special case
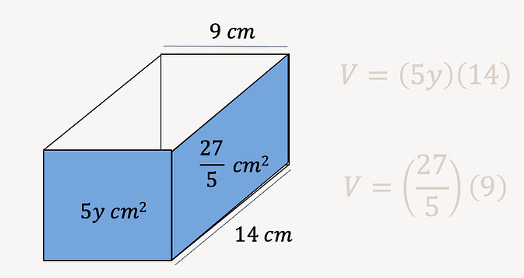
The lesson here is straightforward, but counter-intuitive: whenever you introduce a rule, reach for the version that shows the rule cleanly, not the special case that hides it or comes with its own exceptions, even though the special case may appear simpler. Save the special case for the end, when students can appreciate exactly what makes it different.
2. Do not make them do the arithmetic (yet)
Look at the two versions side by side. The original works all the way through to 60 cm³, units and all. Kris stops at V = (5)(10).
The idea you are teaching is that volume is an area multiplied by a perpendicular length. Working out that 12 × 5 = 60 is a separate skill. If a student selects the right area and the right length but slips on the times-table, they get the answer wrong and conclude “I can’t do this”, when they had in fact nailed the thing you were actually teaching.
I pushed Kris on this. Could you not just use easy numbers? His answer was a three-step approach to arithmetic. First, no arithmetic at all: just build the expression. It is far quicker, so you get three or four times as much practice on the concept itself, and you remove the “I got it wrong” spiral for the students whose arithmetic is shaky. Then, once the concept is secure, easy numbers such as threes, fives and tens, to check they can carry the arithmetic inside a longer routine without tripping. Then, and only then, awkward numbers, because the exam will not be kind, with that arithmetic fluency built somewhere else, in dedicated practice, not here.
His line for it was that you do not learn to ride a bike in the middle of the Tour de France. Of course, we want students fluent in arithmetic. Just not while they are also trying to work out what volume is.
There is a diagnosis point buried in here too. If a student gets the answer wrong and there is arithmetic in the mix, it is more difficult to tell whether they have misunderstood the concept or just fumbled a times-table. Take the arithmetic out, and a wrong answer tells you something clean.
3. Do not give them exactly the numbers they need
Nearly every volume of a prism resource you find online does the same thing: gives you precisely the numbers you need, and nothing more.
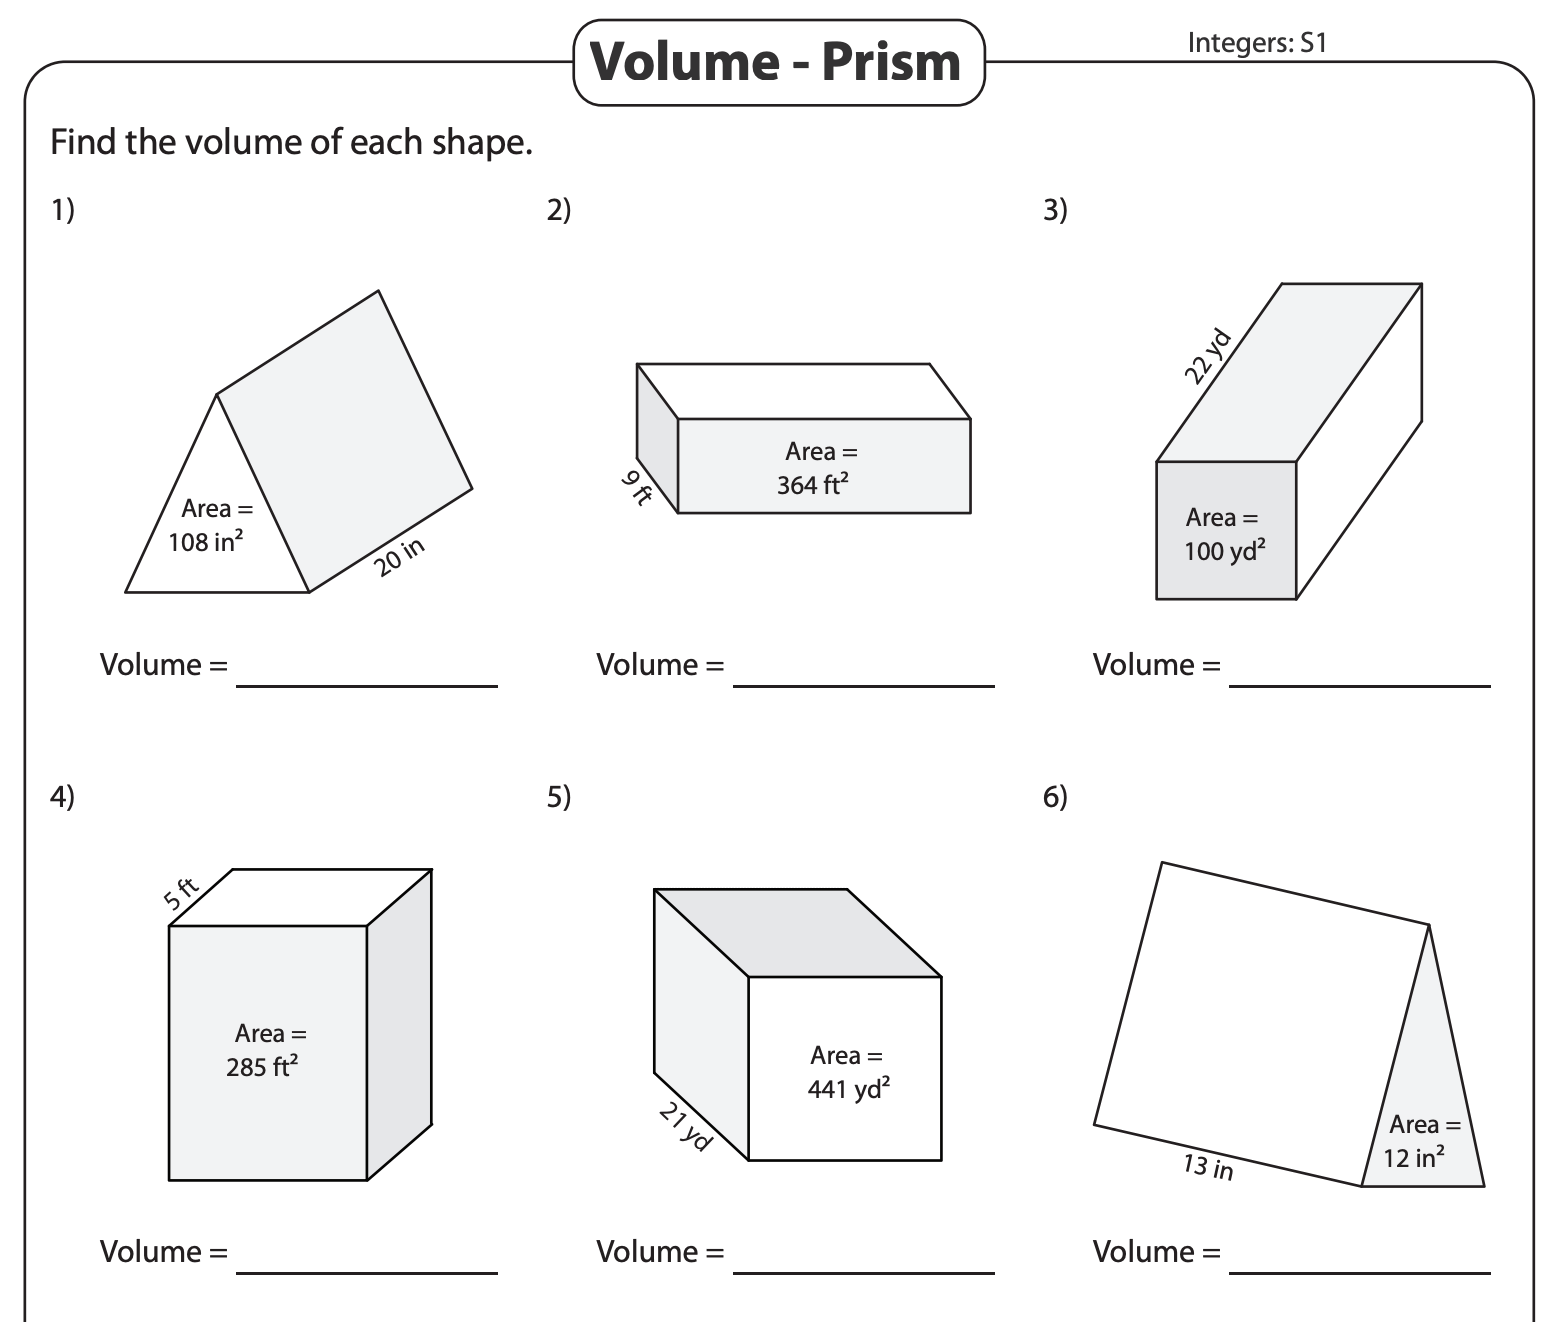
So does the original sequence. Area is twelve, length is five, multiply them together, next one, change the numbers, repeat.
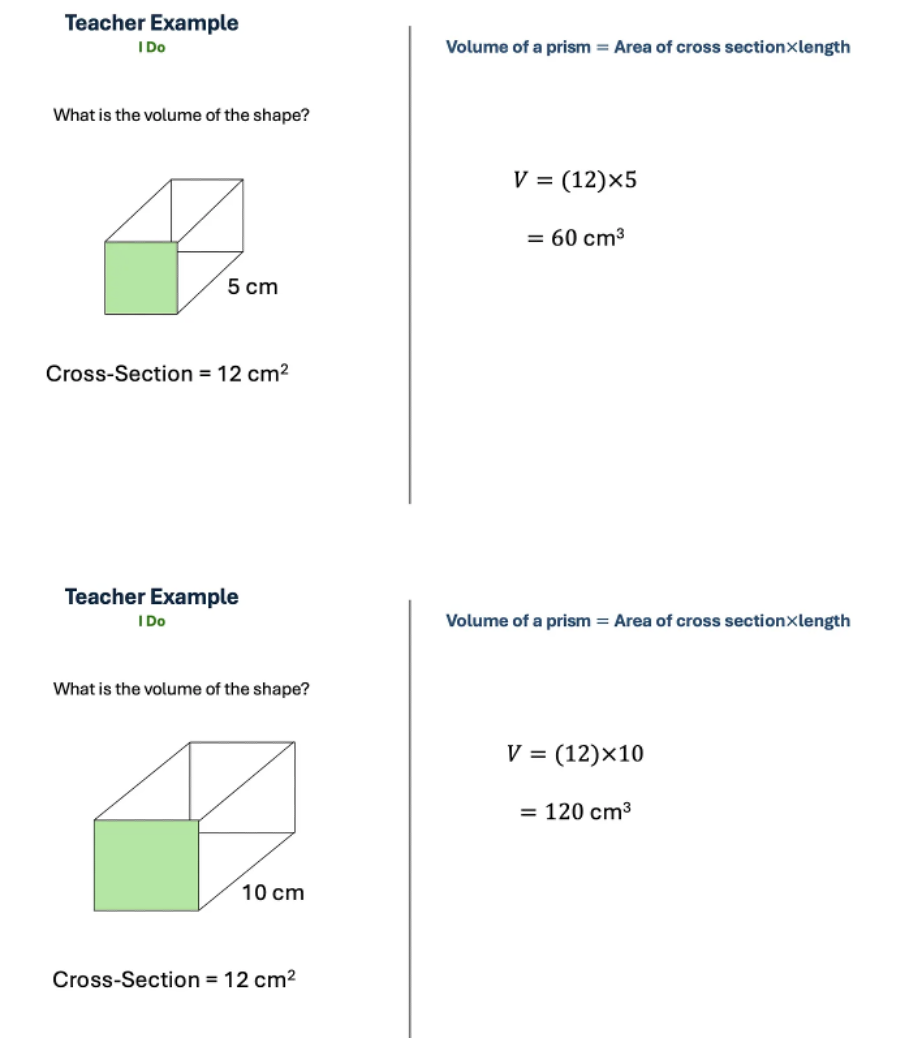
The problem is that if every diagram hands you exactly two numbers, the task is no longer “work out the volume”. It is “find the two numbers and multiply them”. Students are no longer thinking about the concept of volume.
What you actually want them to do is inspect the diagram, decide which measurement is the area and which is the perpendicular length, and select those. So Kris presents more than one measurement each time. Sometimes the area is given twice, sometimes a length:
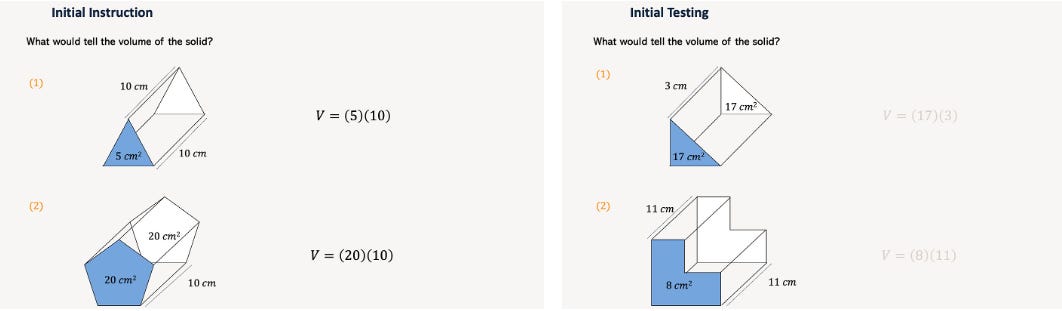
Later in the sequence, a length is included that plays no part in the volume calculation. And the orientation of the solid keeps changing, so the length is never just “the number in the same corner of the slide as last time”.
Again, there is a diagnostic gift here. If a student writes 17 × 17 for the first example, you know immediately they cannot yet pick out which measurement is the length. If they write 17 × 17 × 3, you know they are just multiplying all the numbers they can see. Questions where every number given is needed, no more, no less, would never have shown you that.
Here is the lesson: any time your practice gives students precisely the inputs they need, in the order they need them, ask whether they are doing the thinking or just operating a machine. Redundant information and distractors are not there to catch students out. They are what make the task mathematical, and what focuses students’ attention on what matters
One more thing to notice: Kris does all of this, new shape, redundant information, distractors, across just two teacher examples before handing over to the class. I told him I would have needed four… more on this at the end!
4. Take the rule off the screen
In the original, “Volume of a prism = Area of cross section × length” sits at the top of every single example slide.
Kris makes two changes. First, he simplifies the rule to “Volume is area times length”. That is easier to hold in your head than “area of the cross-section times length”. He drops “cross-section” deliberately because it is a term that carries no meaning for a student until you have taught it, and stopping to teach it first creates a barrier to what you actually want them to learn. He also drops “prism”, so that curved solids like a cylinder are not quietly excluded.

Second, he puts the rule on that title slide only, and then takes it away. If the rule is on the board every time they work, students can lean on it every time, and they may never actually commit it to memory. Kris wants it retrieved, not read. So from then on, it is choral response and cold call. What is volume? Area times length. What is the area? Five. What is the length? Ten. They have to produce it themselves.
The general point is simple. Anything you leave permanently on display, students will use as a crutch rather than remember. If you want it in their heads, state it clearly, make it memorable, then take it away and make them retrieve it. And notice that precision was not the goal at the point of introduction. “Area of the cross-section” is more precise, but “area times length” is more memorable, and you can add the precise language back later, once the concept is secure.
5. Normalise the scary numbers
Once the arithmetic is gone, something lovely becomes possible. In the expansion part of Kris’s sequence, the numbers turn deliberately intimidating. A cross-section of √20 cm². A length of 6x. Faces of 27/5 cm² and 5y.
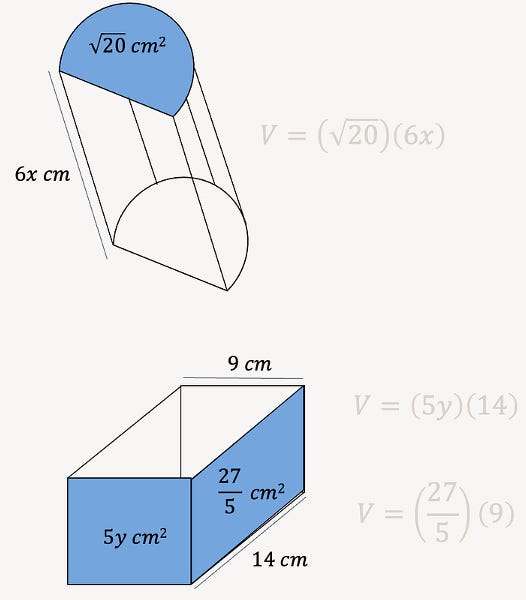
Fractions, surds, algebraic expressions, big numbers: students tend to fall apart at the sight of them. But the fear comes almost entirely from the computation they imply. Take the computation away, and a surd is just a label. The student’s job is still only to pick the area, pick the perpendicular length, and write the expression, which they can now do. So you get to put genuinely scary-looking numbers in front of a class and hand them a high success rate. You are normalising the very thing that usually makes them freeze. Kids feel super smart.
Expansion sequences do carry a risk, because you are showing students something you have not modelled for them. Kris frames it for the class in a way I have since stolen: I am going to show you something that might look a bit weird, and if you get it wrong, that is my fault, not yours. That framing is what makes the risk safe to take.
Beyond volume, the point holds: the intimidation students feel around hard-looking maths is often about the arithmetic bolted onto it, not the concept underneath. Separate the two, and you can build comfort with the notation long before you demand fluent computation with it.
Build it lean, then let the kids show you
I’ll end with a mistake that I would still make despite over ten years of reading about sequence design…
Kris’s teacher-led part is just two examples, and then he hands it to the students.
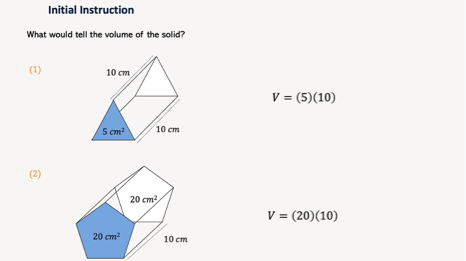
When I looked at the jump from his first example to his second, I felt it was too big - the cross-sectional face change, the area of that face changes, the nature of the redundant information given changes. I would have used four examples. I would’ve presented the first shape with just one 10cm labelled. Then I would’ve presented that exact same shape again, but with an additional 10cm labelled to draw students’ attention to the fact that they only need one of those 10s. Then I would have changed the shape, and then I would have changed the nature of the redundant information.
Kris described this as over-atomising. In other words, breaking things into more steps than necessary.
The argument for two examples over four is efficiency. If two works, four is wasted time you could have spent on something more interesting. But the deeper point is about how you would ever know. If you build the heavily-atomised four-example version and the students succeed, you have learned nothing about whether the leaner version would also have worked. You have just spent longer. Build the lean version first, and if they succeed, then wonderful! And if they fail, that is fine too, because now their responses tell you exactly where to break it down further.
The catch is that you cannot do any of this from the armchair. Kris pointed out that what made the Direct Instruction programmes he draws on so much for his inspiration so effective was not that they were intellectualised into perfection at a desk. It was that they were field-tested relentlessly, put in front of real children, and revised on the evidence. You cannot, as Kris put it, intellectualise your way to a perfect sequence from an ivory tower.
Design the leanest sequence you genuinely think will work, put it in front of students, and let their responses decide where it needs more steps. Not the other way round.
Over to you
So, some questions to leave you with.
Which of the five principles are already embedded in your practice?
Which of the five principles are not embedded in your practice, and which do you feel should be?
Could you choose one of the principles and build it into your very next teaching sequence?
You can listen to or watch the full episode on the Mr Barton Maths Podcast. Kris wrote up his own account of all ten differences on his Substack, which goes into more detail on each one. And if you like this sort of thing, the community he runs there is full of teachers posting their own sequences and getting genuinely useful feedback on them.
And if, heaven forbid, you’d like me to do more episodes like this, let me know in the comments.
Thanks so much for reading, and have a great week.
Craig
🏃🏻♂️Before you go, have you… 🏃🏻♂️
… checked out my brand-new book series: The Tips for Teachers guides to…
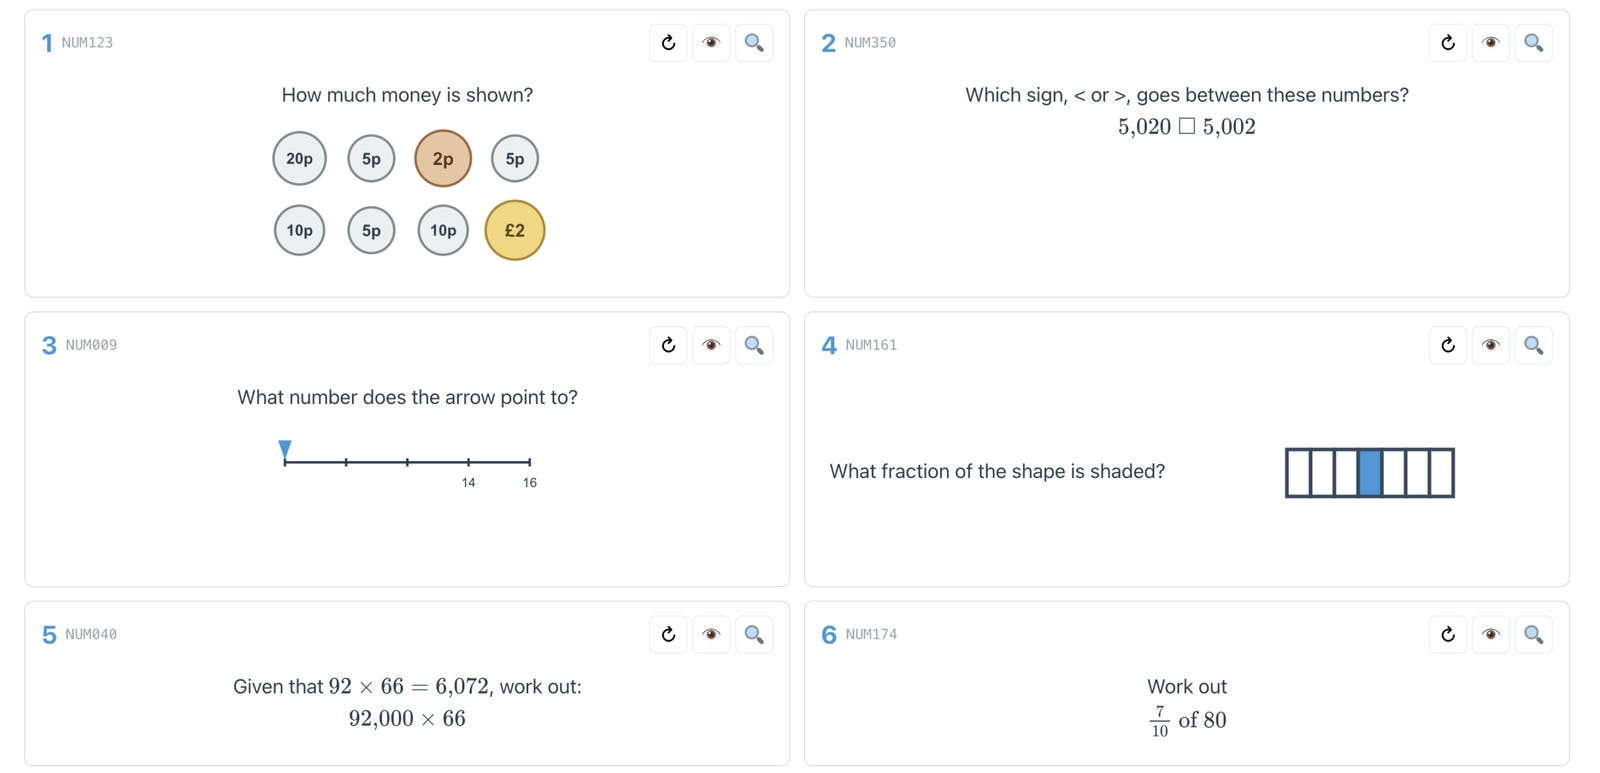
And checked out Ultimate Retrieval Tool page on Mr Barton Maths?
I really enjoyed this discussion, and hope for more episodes like this in the podcast. I know you said that you can access similar style discussions by paying for the unstoppable learning substack, but I prefer the back and forth possible here.
I liked the discussion about the initial teaching sequence between the two of you. I think something important that wasn't brought up with it is student interest - I find the "headache - aspirin" or initial reason for why to learn something very important. Also within the initial teaching sequence that'd be another reason to lean towards Kris' setup with multiple numbers to choose between. As he said giving the students something mathematical to do in choosing the numbers that are relevant is important, and also gives them something to be doing with their minds.
Lovely post.
I think there is a major problem in Kris' initial instruction and test examples though, each shape has three numbers, two of which are repeated. The volume is just gotten by multiplying the two different numbers shown. The first question in the expansion sequence I believe would be a better first example, then I'd have another with a minimal change (possibly the same shape in different orientation) then a bigger change (same orientation as second, but different shape and different amount of lengths given).
Thanks for writing!